Installation specification for dome type optical fiber splice box
Prepare to open the splice box
Clean the site, determine the installation position of the splice box, and arrange the optical cables to be installed.
Check the accessories in the splice box package.
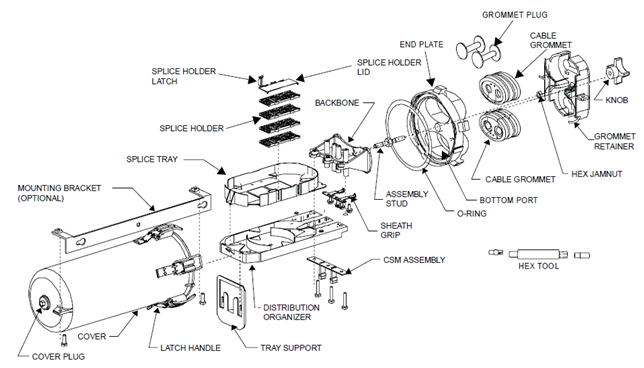
Open the optical cable splice box, remove the fixing screws of the hoop, and pull the lock out to remove the hoop. Pull up the cover of the optical cable splice box to install it.
Precautions: When the weather is bad, you should set up your tent, which should be dustproof and waterproof.
Determine the fixing and stripping length of the optical cable in the box
The optical fiber in the splice closure is branched and connected, and the stripping length of the optical cable is shown in Figure (2)A.
The optical fiber in the splice box is straight through, some parts need to be cut off and then branched and connected, and the length of the optical cable is stripped.
Note: The length of the optical cable to be connected should be reserved, and the stripping length should be carefully determined. If there are other needs, the user can customize the stripping length of the optical cable.
Stripping optical cable, optical fiber jacket
Strip according to the temporary positioning marks, and use a pipe cutter and a longitudinal stripper to strip off the outer sheath of the optical fiber cable. The dimensions are shown in Figure (3). It can also be peeled off according to the actual situation.
Note: The fiber should not be damaged when stripping, and it can be stripped in sections when there is difficulty.

Preparation before separating the cable core and fixing the optical cable
Wrap two layers of insulating tape on the sheath of the cable core for temporary protection, remove the filler in the optical fiber unit, then clean the optical fiber, wind the optical fiber into a fiber ring with a diameter of about 100mm, and temporarily fix it on the optical cable with tape. See Figure (4).
According to the stripping of the optical cable, it can be divided into two types: ① The optical fiber is divided after all connections in the splice box. ②Part of the optical fiber is straight through after being coiled in the splice box, and the other part of the optical fiber is connected with the branched optical fiber.
When some optical fibers need to be straight through, multiple optical cables should be installed in and out of the pipe.
The user should use a screwdriver to knock off the corresponding inlet and outlet pipe plugs from the inside to the outside according to the actual number and diameter of the optical cable.
Matters needing attention: The inlet and outlet tubes of the optical cable should be reasonably selected to facilitate the fusion and sealing of the optical fiber. Leave a 70mm long reinforcement core and cut off the excess reinforcement core.
Fix the fiber optic cable strength core, heat shrink the fiber optic cable, seal and fix it
Pass the optical cable into the heat shrinkable fixing sleeve of the optical cable, and then pass the optical cable into the optical cable entry and exit tube at the bottom of the optical cable joint box.
Use a wrench to insert the reinforcing core into the fixing groove, tighten the nut, and then use a metal wrench to tighten the nut (the metal wrench is self-provided).
Put the aluminum foil paper on the bottom of the splice box, put the heat-shrinkable fixing sleeve of the optical cable to the root of the in-out pipe of the optical cable by hand, and install the branch card.
Heat the heat-shrinkable fixing sleeve of the optical cable with a flame thrower, so that the heat-shrinkable fixing sleeve of the optical cable tightly hugs the optical cable in and out of the optical cable and the optical cable passing through the optical cable splice box to achieve a complete shrinkage seal.
Note: The reinforcing core fixing nut should be tightened. When heating with a flamethrower, the heat shrinkable fixing sleeve of the optical cable should shrink evenly, and there should be no bubbles or voids in the tube.

Connect the fiber
Refer to the instruction manual of the fusion splicer to splicing the optical fibers.
Note: Before splicing, straighten out the direction of the fiber, pay attention to local bending and twisting.
Install the fiber connector to protect the heat shrink tube and accommodate the fiber
Coil the fiber into a circle with a diameter of not less than 80mm, and put it into the fiber splice tray together with the fiber connector protection heat shrink tube.
Note: Be aware of local bending and twisting.
Comprehensive inspection of the installation process
The sheathed optical fiber shall be fixed with a cable tie at the entrance of the optical fiber splice tray.
The optical fiber splice tray should press the splice tray locks from the inside to the outside in turn.
Coil the sheathed straight-through optical fiber into the optical fiber storage tray. If there are reserved optical fibers, they will also be coiled into the optical fiber storage tray at the same time.
Check whether the internal fasteners are tightened, and tighten the reinforcing core nut again.
Check whether the sealing member is in good condition.
Check whether the heat-shrinkable fixing sleeve of the optical cable is firm, reliable and completely sealed.
Note: If any problem is found, remove it in time.
Shell installation and connection box fixing
Put the optical cable splice box cover into the splice box base and align the seam.
Install the plastic hoop between the splice box cover and the splice box bottom, tighten the hoop lock, and fix the lock with screws.
Construction and installation method of optical cable splice box: ① Overhead installation: Use hoop and cross arm to fix the splice box to the pole. ②Wall-mounted installation: The bracket can be directly fixed on the wall with expansion bolts, and there is no need to install metal hoop structural parts. ③Underground installation does not require the installation of metal hoop structural parts.
Note: When installing the plastic hoop, it should be aligned with the center points of the front and rear of the splice box. Wall-mounted expansion bolts generally use M8 bolts.
 中文
中文 


